Monday, 30 June 2014
Friday, 27 June 2014
3. Stop Animation Guide
To make a film with iStopMotion you will need a good idea, lets use a generic theme of a "Goody" vs the "Baddy".
Equipment:
 Characters:
 Set:
Set:
Equipment:
- Camera
- Mac that has iStopMotion installed onto it.
- Materials that your going to be animating, like clay, or for something easier you can use lego.
- A clamp so the camera will stay in the same place. (This is particularly important because if you get it wrong the animation will look scrappy)
- Flat surface to work on.
Characters:
Depending on what you will be using to animate, like clay or lego, you will need to get numerous characters to make your film. For our theme, we will need a Goody, a Baddy and a Prize or Princess, depending on the exact story.
Set:
The setting depends on your personal story, but for an example lets use one of the green lego base pieces. Then you will need to build the setting on top of that that fits your idea.
Camera Shots/Movement:
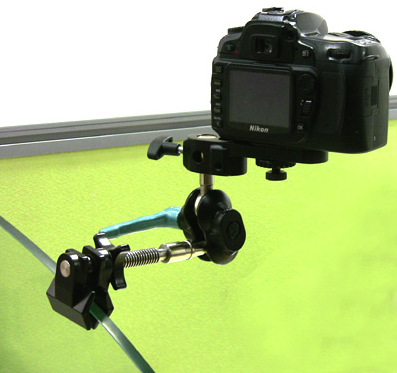 The camera should be positioned so you can see the entire scene, and so that the shot is not affected by shadows or changing light. The clamp will be used to keep the camera in the exact same position, otherwise the scene will change position and it wont look as effective. To shoot the scene you will need to take 3 pictures per frame (so take 3 pictures before you make the new scene).
Editing:
The editing software we will use is iStopMotion, it is an easy way of making stop animation videos. To do it you will link the camera to upload each picture and put them in the right order, making sure that the pictures are in the right order. Then you can press play and the animation should look smooth. If it is jittery and slugish, then you should try increasing the speed of the animation. Or you can do the shots again, and take more pictures per frame, about 5 or 6.
Sound:
Sound is up to you, it depends on your theme and what you want it to sound like. But to import a song you only need to download the track, and drag and drop it onto the sound section at the bottom of the program. Then you can move it from place to place to set it to start in different places.
Exporting:
To export your final animation you need to click on "file", and then save the project, this is just to keep it safe incase anything goes wrong in the exporting process. Then you click on the "file" button, then go down to "export", and then click the "as movie" selection. It will then ask you where to save the exported version of the video to, choose somewhere you will be able to access easily. Now it will start to export, once it is done you will be able to watch your animation.
SO LETS MAKE AN ANIMATION!!!
You're going to want to begin by getting all of the set and characters that you need (shown above) and then you will need to set up your location with the beginning scene. Now you need to adjust the camera angle so that you can see the entire set and the characters you want on screen. Then you can start producing your animation! You will have to take three pictures, and then move your character incredibly slightly, and then take another three pictures
Camera Shots/Movement:
The camera should be positioned so you can see the entire scene, and so that the shot is not affected by shadows or changing light. The clamp will be used to keep the camera in the exact same position, otherwise the scene will change position and it wont look as effective. To shoot the scene you will need to take 3 pictures per frame (so take 3 pictures before you make the new scene).Editing:
The editing software we will use is iStopMotion, it is an easy way of making stop animation videos. To do it you will link the camera to upload each picture and put them in the right order, making sure that the pictures are in the right order. Then you can press play and the animation should look smooth. If it is jittery and slugish, then you should try increasing the speed of the animation. Or you can do the shots again, and take more pictures per frame, about 5 or 6.
Sound:
Sound is up to you, it depends on your theme and what you want it to sound like. But to import a song you only need to download the track, and drag and drop it onto the sound section at the bottom of the program. Then you can move it from place to place to set it to start in different places.
Exporting:
To export your final animation you need to click on "file", and then save the project, this is just to keep it safe incase anything goes wrong in the exporting process. Then you click on the "file" button, then go down to "export", and then click the "as movie" selection. It will then ask you where to save the exported version of the video to, choose somewhere you will be able to access easily. Now it will start to export, once it is done you will be able to watch your animation.
SO LETS MAKE AN ANIMATION!!!
You're going to want to begin by getting all of the set and characters that you need (shown above) and then you will need to set up your location with the beginning scene. Now you need to adjust the camera angle so that you can see the entire set and the characters you want on screen. Then you can start producing your animation! You will have to take three pictures, and then move your character incredibly slightly, and then take another three pictures
2. Development of Animation
 Animation has developed significantly in the few years it has been around, there have been numerous pioneers, the first being Joseph Plateau he developed the Phenakistoscope. The Phenakistoscope used a spinning disc attached vertically to a handle. Arrayed around the disc's center were a series of drawings showing phases of the animation, and cut through it were a series of equally spaced slits. The user would spin the disc and look through the moving slits at the disc's reflection in a mirror. The scanning of the slits across the reflected images kept them from simply blurring together, so that the user would see a rapid amount of images that appeared to be a single moving picture. Plateau was significant because he was the very first main pioneer of animation, he was the father of a generation that would span hundreds of years.
Another notable pioneer of animation William Horner, He created the zoetrope in the year 1834.A zoetrope is a device that produces an illusion of action from a rapid succession. It was basically a improvement on the Phenakistoscope. The Zoetrope consists of a cylinder with slits cut in the sides. On the inner surface of the cylinder is a band with images from a set of pictures. As the cylinder spins, the user looks through the slits at the pictures across. The scanning of the slits keeps the pictures from blurring together, and the user sees a rapid succession of images, producing the illusion of motion.

Emile Reynaud created the Praxinoscope in the year 1877. the praxinoscope was a major improvement on the zoetrope. the improvement was that the narrow viewing slits were replaced with mirrors so that the animations could been seen more clearly and gave a better effect. the way the animation device worked was that it used a strip of pictures placed around the inner surface of a spinning cylinder. Emile Reynaud also created the first public animation that was seen by many people. this was important to animation because it lead to more and more public animations, and got the public interested in animation with this device and also the animation films he created.
 Eadward Muybridge Known as the 'father of the motion picture', his early photographic experiments laid the foundation for modern cinema, with his study, The Horse In Motion made in 1882, regarded by many as the first ever moving picture. Developing his keen interest in photography whilst recovering from a stage coach crash in 1860, Eadweard Muybridge moved to America, joining a San Franciscan photo business. Quickly gaining reputation for landscape work, he was appointed director of photographic surveys for the U.S. Government in 1868, conducting studies of numerous remote areas, including the newly purchased Alaska. It is said that his work sparked the creation of the cinema experience that all of us know and love.
Thomas Edison was the inventor of the Kinetoscope. This device was used in stop motion animation. The Kinetoscope is an early motion picture device, but not a movie projector. It was designed for films to be viewed individually through the window of a cabinet containing its components. This invention was the basic introduction that would become the standard for all cinematic projection before video. Watching it creates the illusion of movement by conveying a strip of film bearing images over a light source with a high speed shutter. This was incredibly significant because it was the first step to projecting animations onto the big screen.
 The Lumiere Brothers patented the cinematograph, which contrary to Edison's "peepshow" kinetoscope, the former allowed viewing by multiple parties at once, like current cinema. Their first film, Sortie de l'usine Lumière de Lyon, shot in 1894, is considered the first real motion picture in history. So from then the use of animation in cinema increased dramatically.
DEVELOPERS

 Ray Harryhausen was an American visual effects creator, writer, and producer who created a form of stop-motion model animation known as "Dynamation." His most memorable works include the animation on Mighty Joe Young, with his mentor Willis H. O'Brien, which won the Academy Award for special effects; The 7th Voyage of Sinbad, his first color film; and Jason and the Argonauts, featuring a famous sword fight against seven skeleton warriors. His last film was Clash of the Titans, after which he retired.
CONTEMPORARY WORK
 Stephen and Timothy Quay studied illustration in Philadelphia before going on to the Royal College of Art in London, where they started to make animated shorts in the 1970s. They have lived in London ever since, making their unique and innovative films under the aegis of Koninck Studios. Influenced by a tradition of Eastern European animation, the Quays display a passion for detail, a breathtaking command of color and texture, and an uncanny use of focus and camera movement that make their films unique and instantly recognizable. Best known for their classic 1986 film Street Of Crocodiles, which filmmaker Terry Gilliam recently selected as one of the ten best animated films of all time, they are masters of miniaturization and on their tiny sets have created an unforgettable world, suggestive of a landscape of long-repressed childhood dreams.
 Tim Burton has created huge amounts of animated movies, being one of the most well known and well respected directors of all time. Burton has worked repeatedly with Johnny Depp, who has become a close friend of Burton since their first film together. He has also worked with musician Danny Elfman, who has composed scores for all but two of the films Burton has directed. Actress Helena Bonham Carter, Burton's domestic partner, has appeared in many of his films. He also wrote and illustrated the poetry book The Melancholy Death of Oyster Boy & Other Stories, published in 1997, and a compilation of his drawings, sketches and other artwork, entitled The Art of Tim Burton, was released in 2009.
Monday, 23 June 2014
Friday, 20 June 2014
30. Annotated Drafts


I used the software Final Cut Pro to edit the video, consisting mainly of cuts and fades. We used a Canon Legria Camera, and uploaded it using the Log and Transfer function. The editing process was fairly easy, considering the product only had to be around 15 seconds long, however we still had to make sure that it was done to professional standards. After editing the entire thing together we discovered a major continuity error, of one of the actors swapping sides on the bench, so we decided to re film this small section to consolidate the professional nature of the Ident.
Focus Group Notes and Analysis

Me Laurence and presented our pitch to the class, here is some of the feedback:
WWW:
Good idea for your ident.
The idea is flexible and can have different spin offs.
The use of the E4 logo as a character makes the audience have an emotional link.
EBI:
Perhaps have a soundtrack under it with some sort of voice over.
Make sure there is no bad cuts, make everything smoother.
Subscribe to:
Posts (Atom)